
KEEPING
DELTAS
DRIVING
Lancia Delta Integrale specialists and enthusiasts
Land Rover. 3
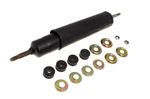
Attention is turning to the suspension, this Defender has coil springs which sit on an axle mounting disc, this disc rusts away but replacements are easily available. The disc sits on a support bracket welded to the axle, this and the rear shocker mountings also rust away. The remains of the old brackets were ground away back to the axle's bare metal, new brackets were purchased
and welded into place.
Youtube was carefully watched to see how this was done, it's important to get the axle horizontal in line with the chassis, and keep it there while welding the mountings in place, which also need to be horizontal.


The shocker mounting is underneath the axle, the spring mount on top. I cleaned the axle casing and ground an angle on the bracket edge for welding, with careful measuring and a spirit level I welded the 4 items to the axle. I did a good penetrating weld on the angle, then a second run over the top just to make sure. The axle mounts to the chassis at 4 points, plus the springs and the shocks,
so it's a good and secure axle location.
The under axle shocker mount allows a long travel for the unit.
One happy aspect of this rebuild is the low price of spare parts,
the parts are mostly branded Britpart, but are proudly produced
in China. This isn't a performance car, so there's no need for suppliers to give a false location of manufacture, simple, tough
and well priced generic parts will mostly do fine.
£27 + vat

Back brakes were next, I replaced piston assemblies, pads and drums. I also replaced the flexi pipes and solid brake lines. Again Britpart items, big beefy drums which were replaced according to my Haynes manual, the return springs and adjusters are positioned not quite as you would think.


The next generation of
Defender has disc brakes
on the back.
These big drums should be
good enough for us.
Front four piston calipers
are repaired next.


The front brakes have an unvented disc with 4 pot calipers. I ordered 8 replacement pistons from Frentech, the closely related next generation Discovery
based caliper has larger pistons, so care must be taken when ordering.
Getting the old pistons out was a challenge! Some came out ok, but where no amount of banging would shift em, I welded a bar on the piston and turned it to loosen them, then I could pull them out.
Checking on ebay, complete new caliper units are available for £60 or so. These will be Chinese, and perhaps using the original Girling for this safety critical
part is a safer option.

The calipers have a piston seal as usual, but they also have a dust cover seal which has a light metal cover, this has a turned edge which clips into a groove on the caliper casting. These are tricky to insert properly, they must go in straight or you'll crimp the edge over and never get it straight again.
After cleaning the piston bores well, I inserted all the seals with red brake grease,
the pistons ran with just the right smoothness and resistance.
The job was completed with new pads, cleaned up pins and new flexible pipes.
The copper pipe from the flexi end is a particular shape, it goes back, around and down, then a 90o into the caliper. These are available on ebay already shaped, that seemed a simpler option, right and left handed too, so I ordered a pair.
The job was completed with a pair of new back plates, these were genuine
Land Rover items from an ebayer's shed, they still had LR part stickers on.
I was pleased to find these and make a good saving


Before I installed the brake servo on the newly painted bulkhead,
I gave the servo unit a good sand down, and a few coats of
gloss black spray. You might notice I masked off the original sticker.
For the paint to get out of the rattle can nozzle it must be water thin,
so a good few coats are advisable.
It dries very quickly so it's no trouble

The brakes were simple for a one man pressure bottle air bleed. Something I'd
never considered before was the size of brake fluid filler caps, they're all the same!
At least on my old motors anyway. Thanks for reading this, I hope you enjoyed it.
More again soon