
KEEPING
DELTAS
DRIVING
Lancia Delta Integrale specialists and enthusiasts
Rust
Small word, big trouble!
In the 1970s when Lancia was developing the Delta, rust prevention
wasn't a high priority. Especially in sunny Italy.
The Delta has a complicated structure with many welded pressed sections.
The back roof edge and the rear boot floor have 3 metal layers spot welded together, inviting water retention.
When the Delta became the Integrale its body shell needed more strength,
internal bracing was used to do this, welding another section of steel inside an existing component, making a bare metal joint and another rust trap. An Integrale
rusts from the inside out, our favourite car will rust anywhere,
but there are several popular areas.

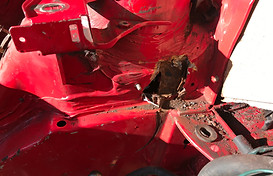
1 front corner, we've all seen
them like that!

The corner cleaned out a bit, I'm going to save the inner wing mounting holes, the gearbox mounting bolts on from the inside here, so those holes must be saved.
One of these points is the front suspension mounting, 3 hollow sections meet at each front corner where the suspension stay bar plate fits. Captive nuts are fitted inside to bolt the plate up, there is a water exit hole at the bottom of this box, but there are plenty of places for the water to visit first!
2 rubber bungs are fitted to this corner, and the whole thing is hidden behind the inner wing lining. This complicated area takes stress from the suspension and engine, so it needs careful fixing,
let's have a look how it's done.
We are working here Rupert's Evo1, although it has spent
many years in sunny Spain, any damp from a shower of rain is contained in the unpainted joints between the inner strengthening members, so it starts rusting inside long before
being visible from outside.


After cleaning the area up I started on the engine side, the gearbox mounting bolt holes could be saved so I made a cardboard pattern to fit.
I made a plate from 18 gauge steel, which is a bit heavier than the outside panel work, and what was used on the Delta chassis parts.
I tacked this in place, then butt seam welded it in.

More cardboard patterns, the 18 gauge steel
is too heavy to cut with shears, so it's easier to get the pattern right with card first.


Here I have made a 90 degree plate with the captive 17mm nut welded inside, don't look too close at the nut welding!
I first bolted up the suspension mount with its locating pins through the body hole and through my new plate hole,
I then dressed the plate into a happy fitting position.
I had pre drilled the plate's upright side to puddle weld onto the inner wing piece and strengthen both, when the captive nut was comfortable in position I tacked it in place.
Then I did the puddle welds and I put a good run of weld around the outside edge. I could then release the bolted on suspension mounting.


I formed a single piece of steel to fit onto the inner rail edge, to sort of duplicate the original look of a spot welded edge.
I cut a large hole in this for the rubber bung.
The back of the metalwork was sprayed with aluminium weld through primer, and after cleaning down the outer areas were sprayed with acid etch primer, the whole area was then brush painted with 2 coats of Lechler single pack semi matt metalwork finish.

Due to the way an Integrale was made, none are immune from rust. Some are much better than others, but even the best looking Evo2 can have hidden corrosion issues. It's a long process to fix, stripping the car down to its bones, but it's also interesting to get into the heart of our unique little cars. We enjoy saving every one!